• Welcome to Overclockers Forums! Join us to reply in threads, receive reduced ads, and to customize your site experience!

SOLVED Please help me use TestDisk correctly to recover partition which disappeared

Overclockers is supported by our readers. When you click a link to make a purchase, we may earn a commission. Learn More.

c627627

c(n*199780) Senior Member
Joined
Feb 18, 2002
Windows can't see the drive letter - it just wants to format it. 2TB of data is at stake. I don't want to do anything to ruin it but I feel that it is recoverable. I have an empty 2TB disk ready if I need to transfer anything:

Test Disk http://www.cgsecurity.org/wiki/TestDisk
1. Intel/PC Partition
2. Analyse

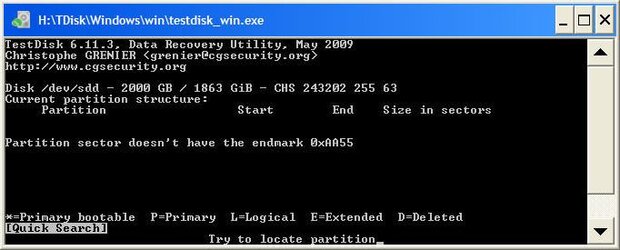
Then it finds it:
Lost2TBa.jpg


Then I say Yes when asked
Lost2TBb.jpg


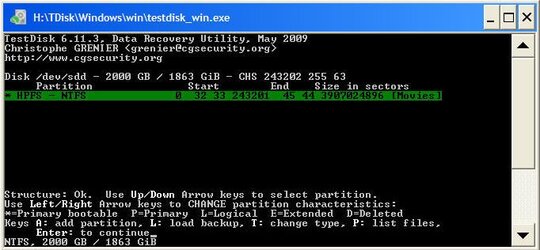
Then it finds it, it is clearly there:
Lost2TBc.jpg


There it is! Now I don't want to do anything to ruin it by writing to a partition table in a wrong way, preferably maybe I should just copy the data to a new 2TB drive so as not to risk loosing the info?


Which choice should I select?


EDIT:
:comp:

I think I got the whole thing figured out or as much as it is useful for me:


Testdisk http://www.cgsecurity.org/wiki/TestDisk


• To recover a damaged partition table:

1. Start testdisk_win.exe

2. Create a new log file

3. Scroll down to drive which contains the damaged partition table > Proceed

4. Intel > Analyse > Quick Search

5. Should TestDisk search for partition created under Vista ? > Y


6. If the lost partition was a primary partition, move arrows to change * to P and press Enter.
[P may already be there, if it is, still go to the next step to 'Write partition table'.]


7. Move arrows to Write and press Enter.

8. Write partition table, confirm ? (Y/N) > Y

9. You will have to reboot for the change to take effect.


• To recover individual files / individual directories from a hard drive which cannot display them in Windows because of a damaged partition table:

1. Copy Testdisk to hard drive with enough space to recover the lost files/directories
then start testdisk_win.exe

2. Create a new log file

3. Scroll down to drive which contains the files/directories to recover > Proceed

4. Intel > Analyse > Quick Search

5. Should TestDisk search for partition created under Vista ? > Y


6. Instead of moving arrows to get to the letter P, physically press key P on your keyboard.
This lists the files and directories

7. Now use arrows to move down to select any file or directory and press C on keyboard to copy selected file or directory.

or

To copy all files and directories, move the arrow to the top marked with one dot: .
Then press C on keyboard and all files and directories will be copied to the location where you ran TestDisk from.


• Use instructions above to recover files/directories from a hard drive with a damaged partition table.
If partitions already exist, it may be recovered to an image file. To create an image of the entire partition:

0. Copy Testdisk to hard drive with enough space to store the image of the partition

1. Create a new folder inside which you want to save the image.dd file then start testdisk_win.exe

2. Create a new log file

3. Scroll down to drive which contains the partition to copy > Proceed

4. Intel > Advanced > Scroll down to partition to recover

5. Use right arrow to get to Image Creation > Enter

6. Select where to store the image.dd file > Press Enter then press the Y key on keyboard.

7. File image.dd will contain the recovered partition.

You can use freeware such as OSFMount to mount image.dd files to access files inside them directly.
 
Last edited:
Once again, my fear is that writing directly to the lost drive may end up messing the partition table. Luckily I may have just figured out how to copy lost files to another hard drive:


1. Copy TestDisk program to the hard drive on which you want to recover the lost files to.

2. Start TestDisk from there. I actually simply copied the contents of the following folder to the root of the hard drive on which I am recovering the lost files to:
Testdisk\Windows\win
then started testdisk_win.exe


Here's the key part from when you get to the last screen above:

3. Instead of moving arrows to get to the letter P, physically press key P on your keyboard.
This lists the files.


If you simply move arrows to change the * sign to the letter P - files will not be listed.


Use arrows to move down to select any file or directory and press C on keyboard to copy selected file or directory.

Now the selected file or directory will be copied to the location where you ran TestDisk from.


Does anyone know: How can I select multiple files at once?


P.S. I think I just remembered. When I originally used TestDisk successfully, I think I used to it to write a giant image file from the lost partition to another hard drive. Then I extracted the files and directories from that giant image file. I think it was a testdisk image.dd command...


P.P.S. All right, here's my plan:

1. Use the above outlined method to resurrect all lost files and folders from the dead. It is working!
2. Test the testdisk image.dd command, obviously that method would be faster than recovering files and directories one by one.
3. Test writing directly to the partition table of the lost drive to see if files could once again show up under Windows if the partition table is corrected.
 
Last edited:
It's been a while since I used testdisk to recover individual files, but IIRC, it was very cumbersome. If you want to select multiple files, you have to use the : key. The only way I know of to select all the files is to wedge something onto the "shift" and ";" keys down.

I normally just have it search for lost partitions then choose the write option to write it to the disk.
 
Nothing happens when you press the : key.

You go up and down the file list and then press C to copy the file you selected but how do you select two files to be copied?
 
I think I got the whole thing figured out or as much as it is useful for me:


Testdisk http://www.cgsecurity.org/wiki/TestDisk


• To recover a damaged partition table:

1. Start testdisk_win.exe

2. Create a new log file

3. Scroll down to drive which contains the damaged partition table > Proceed

4. Intel > Analyse > Quick Search

5. Should TestDisk search for partition created under Vista ? > Y


6. If the lost partition was a primary partition, move arrows to change * to P and press Enter.
[P may already be there, if it is, still go to the next step to 'Write partition table'.]


7. Move arrows to Write and press Enter.

8. Write partition table, confirm ? (Y/N) > Y

9. You will have to reboot for the change to take effect.


• To recover individual files / individual directories from a hard drive which cannot display them in Windows because of a damaged partition table:

1. Copy Testdisk to hard drive with enough space to recover the lost files/directories
then start testdisk_win.exe

2. Create a new log file

3. Scroll down to drive which contains the files/directories to recover > Proceed

4. Intel > Analyse > Quick Search

5. Should TestDisk search for partition created under Vista ? > Y


6. Instead of moving arrows to get to the letter P, physically press key P on your keyboard.
This lists the files and directories

7. Now use arrows to move down to select any file or directory and press C on keyboard to copy selected file or directory.

or

To copy all files and directories, move the arrow to the top marked with one dot: .
Then press C on keyboard and all files and directories will be copied to the location where you ran TestDisk from.


• Use instructions above to recover files/directories from a hard drive with a damaged partition table.
If partitions already exist, it may be recovered to an image file. To create an image of the entire partition:

0. Copy Testdisk to hard drive with enough space to store the image of the partition

1. Create a new folder inside which you want to save the image.dd file then start testdisk_win.exe

2. Create a new log file

3. Scroll down to drive which contains the partition to copy > Proceed

4. Intel > Advanced > Scroll down to partition to recover

5. Use right arrow to get to Image Creation > Enter

6. Select where to store the image.dd file > Press Enter then press the Y key on keyboard.

7. File image.dd will contain the recovered partition.

You can use freeware such as OSFMount to mount image.dd files to access files inside them directly.


Last edited:
i've used GetDataBack successfully before, just FYI. Most recently I used it on a drive that had a corrupt partition table or somehow the NTFS partition got screwed up; not sure exactly what went wrong. but it saw the data on the drive fine so I was able to pull documents and pictures and things off.
 
Yes. Of course these instructions above are using open source freeware but it's good to know which pay-for programs worked for people.
 
Hi.
I have an external hard drive that has failed and was told to try out testdisk to recover files.
All was sort of going well regarding a scan when my surface pro decided to lock me out. After restarting, I was able to see the original drive name and was hopeful I could recover files.

It asked me to write a partition table and that's when I found this post.
I followed the instructions up to rebooting. As the surface only has 1 USB port, I plugged in a Seagate drive with built in USB ports and plugged the broken drive into that in order to follow the next steps. The drive stopped appearing and now I'm fairly stuck.

If I run testdisk again, a drive shows up with no partition 4142 MB/ 3950 MiB
If I look in Disk Management, it asks me to initialise disk with either MBR or GUID and shows a not initialised disk with 3.86GB unallocated space.

I felt like I was so close and may have nuked any chance of recovering this drive myself, but the surface doesn't have enough space to recover the files hence plugging in the Seagate.

If I initialise this partition, is there any hope of recovering from the other? The drive spins when turned on but stops seconds later instead of reading the rest of the drive and showing up as normal.

I appreciate this is a 9 year old post, but I'm struggling to find any other information.

Many thanks
 
chuck the dead drive in the freezer overnight.
have the computer and storage drive ready and waiting, plug it in live and go!!!
this has worked more than once for me.
if that fails try burning A linux live cd and reaching into the dead drive.
 
chuck the dead drive in the freezer overnight.
have the computer and storage drive ready and waiting, plug it in live and go!!!
this has worked more than once for me.
if that fails try burning A linux live cd and reaching into the dead drive.

I'd read about the freezer hack for a previous drive. Never tried it. Might give the Linux live a go instead, as this stuff is pretty important.

Thanks for the response
 
Back